|
Hummingbird Feeder
~~~~~~~~~~~~
submitted by rosebuds

Supplies needed
*clear straw just under 3/16” diameter
*20-22 gauge gold wire
*red Polymer Clay
*tacky glue
*Red Gallery Glass Transparent Glass Paint
*Kemper 5/16” round pattern cutter tool (you can also use another straw that
is the same size
*Kemper 3/16” flower pattern tool (5 sided flower)
{If you do not have these tools, that is fine, but you will have to use a
substitute to make these shapes. The flower can be just a tiny circle that you
can form into a cup-like shape. It is well worth it to buy the tools for many
other things. Here is a link to see what they look like for those of you who do
not know abut them.}
http://polymerclaymall.com/english/kemper/patterncutters.htm
*Kemper ball stylus tool
http://polymerclaymall.com/all-images/kemper-images/newimages/bBSS-BSL.jpg
Getting started
~~~~~~~~~~~~~~~
A few hints before making feeder…
~I use a Corelle dinner plate to roll the clay out. Then I don’t have to move
the cut outs and they can be baked right on the plate. They do not loose their
shape.
~It is just as easy to make several at a time as just one.
~Cut clean through the clay completely.
~Use sharp pointed tweezers for “hands” in making anything this small.
Making the Feeder
~~~~~~~~~~~~~~~~~
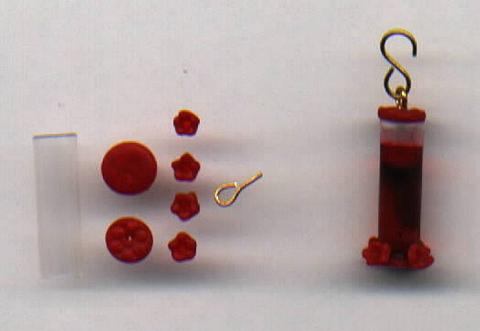
*Roll out the red clay to a 1/8” thickness.
*Cut one circle using the 3/8” round Kemper tool.
*Cut another circle using the straw that you have for the cylinder of the
feeder. This will be the lid.
*Peel up any excess clay around circles.
*I also make an impression for the top of the lid with a leather design stamping
tool. You can stamp any design on the top if you wish…optional. If you do
this, stamp before baking.
*Roll out another section of clay to 1/16” thickness.
*Cut 4 – 3/16” flower shaped or substitute a round circle same size
*Peel up any excess clay around flowers.
*Gently pick up each flower using the flat side of X-acto knife…using the ball
stylus tool, or sanded round end of a toothpick, push the rounded end of tool
into the center of the flower gently without piercing a hole and form the flower
into an even cup shape. Place back on plate.
*Pierce a hole in the center of the smaller circle while on plate with a pin. It
needs to be the size of the wire that you are using for the hanger. Twirl the
pin around until you have the opening size of the wire. {you cannot do this
after baking, as the clay will break}
*Bake according to package instructions and cool.
*Cut the clear straw into a ¾” length. It is very important that you make
both ends of the straw straight across and even. {I cut with sharp scissors}
*Glue one end to the bottom 5/16” circle. Do not over glue…all you need to
do is run glue along the outside bottom of the straw so it is sealed to the red
circle. Let dry completely. Do not hurry this step because if you add the
“nectar” before it is dry, it can leak out.
*Carefully, drop by drop, fill the straw with the red Gallery Glass Paint. It
does not have to be full. Let dry overnight.
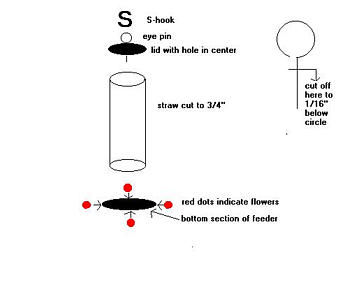
*Make a hanger for the top by rolling the wire around a toothpick forming a
circle. Cut off excess on one side, leaving only a 1/16” straight wire down
from the circle. {see illustration}
*Dab a little amount of glue on end of straight wire and insert into the red lid
with the hole in center. Secure in place.
*Dab a small amount of glue around the top edge of the straw. I stick the tip of
my finger in glue and gently dab onto top of straw. Secure the lid to the top of
the straw. Let dry…note that the glue inside may be white for several days,
but it does turn clear eventually.
*Glue the flowers onto the bottom section at an angle and just on the edge
between the bottom section and the straw evenly divided. {see illus.} Let dry.
*I use ‘S’ hooks to attach the feeders to the houses.
Illustration


Use your back button to return to Craftroom for additional
projects
|