|
|
|
|
|
|
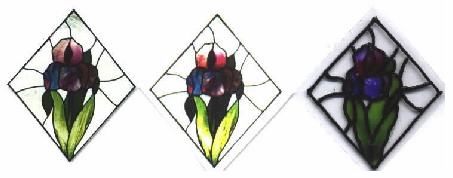
Miniature Stained Glass * Iris * ~~~~~~~~~~~~ Mini Iris Stained GlassSupplies
Needed
*Black
slick paint *Gallery
Glass Paints in purple, green, blue, red. *Pin
to pop air bubbles *Clear
plastic that you can cut with scissors. {I use packing plastic that items from
the store come in. I just cut out the flat larger pieces to reuse} *Black
fine point dry-erase marker Making
the Project
*You
will need to copy the first picture of the Iris Photograph. {or your own} Size
it to about 1 ¾"X 1 ¾". Print it on white paper. *Cover
the photo with a section of the clear plastic. Tape down two sides of plastic to
paper to keep it in place. *Trace
the Iris design onto the plastic using the dry erase pen. {The ink can be
removed later if you use the dry erase pen.} *Turn
the plastic over and work on the opposite side of dry erase markings, re-taping
again. *Trace
over ALL the black lines with black slick paint. Even pressure is very
important…if you make a mistake, carefully use a damp cotton swap to remove it
from the plastic. This paint is very forgiving…you can immediately remove it
and start all over if you don't like what you have done. *Let
this paint dry for about 45 minutes. {you can do several different ones using
other patterns at the same time.} *Paint
your leaves first. Just gently squeeze out the Gallery Glass paint into the
leaves sections as shown in pictures. Use the applicator tip to move the paint
around. Don't try to make an even layer of paint, because having it uneven give
it depth of color. *I
used a combination of colors on several petals. First, squeeze a drop of blue
into any petal…then drop some purple…then with the applicator tip, blend the
edges of the two connecting colors until you cannot see a defining line between
the two. *Drop
red into another petal and add the purple doing the same blending technique. *Leave
one petal all purple. *You
can leave the clear parts empty or if you want to add Gallery Glass Clear Frost,
now is the time for that. *Let
dry completely. After drying you can remove the dry erase markings from the
backside of the project. *You
can frame it, hang it alone or in a big window of a dollhouse. Note:
This particular Iris was made by my Dad and it is in the front door window of
his home. He framed the Iris right into the door itself. He has done several
stained glass projects of which I am proud to own. Let me add some ideas for you to personalize your own stained
glass project…
If you are familiar with Microsoft Photo Editor {or Photoshop and any other photo program) then you can take any photograph you have and turn it into a mini stained glass project. If you are not familiar with Photo Editor, get familiar with it because it will open up a completely new world for you with miniature making. Almost everyone has this program on their computer in Windows so now is a good time to use it if you have not before. Maybe you have a favorite pet, or a special flower from your garden or even a child or Grandchild that you would like to create a stained glass image of. Keep in mind that the more detail to the photo, the harder it will be to be accurate. The Gallery Glass paint bottles are not meant for mini projects like this so you may want to move them to bottles with fine point applicators. Make your own micro tipped bottles … Purchase small empty plastic long-necked bottles (about 3-4" tall) from hobby stores. Unscrew the writing tip end from a mechanical pencil. Cut the tip of the plastic bottle until the pencil tip will fit and screw it on tightly on the plastic bottle. Buy several bottles and fill and label them will all the glues that you use often. Keep a beaded head straight pin, which will not rust, in the hole of the pencil tip so it will not dry out.
Use your back button to return to Craftroom for additional projects contributed by: rosebuds
|
|
Send mail to webmaster
with questions or comments about this web site. |